Implementation
If you've completed the steps described in the Setup guides, you are now ready to implement our React Native module for iOS in your app. Our module supports iOS 9 and up.
To start please make sure you have followed the Getting started with React Native tutorial. Once you have met all the requirements and you have prepared your machine for React Native development you can then start implementing our module.
Requirements
When using React Native 0.60 and up, you must make sure you are using our React Native module 2.1.0 or higher and Xcode 11. This version of React Native supports Autolink which enables the use of CocoaPods for dependency management.
Install the Module
Open the terminal under your project root directory and execute the following command:
react-native install notificare-push-lib-react-nativeThen make sure you install the latest pods by running the following command:
cd ios && pod installAs soon as your pods are installed, make sure you close all sessions of Xcode and open the project's workspace using the following command:
open MyApp.xcworkspaceWhere MyApp should be the name of your project.
Configure your App
You will need to add some files included in our native library. For that, please download our latest release here. Unzip the downloaded file and open the resulting folder, then drag and drop Notificare.plist into your Xcode project:
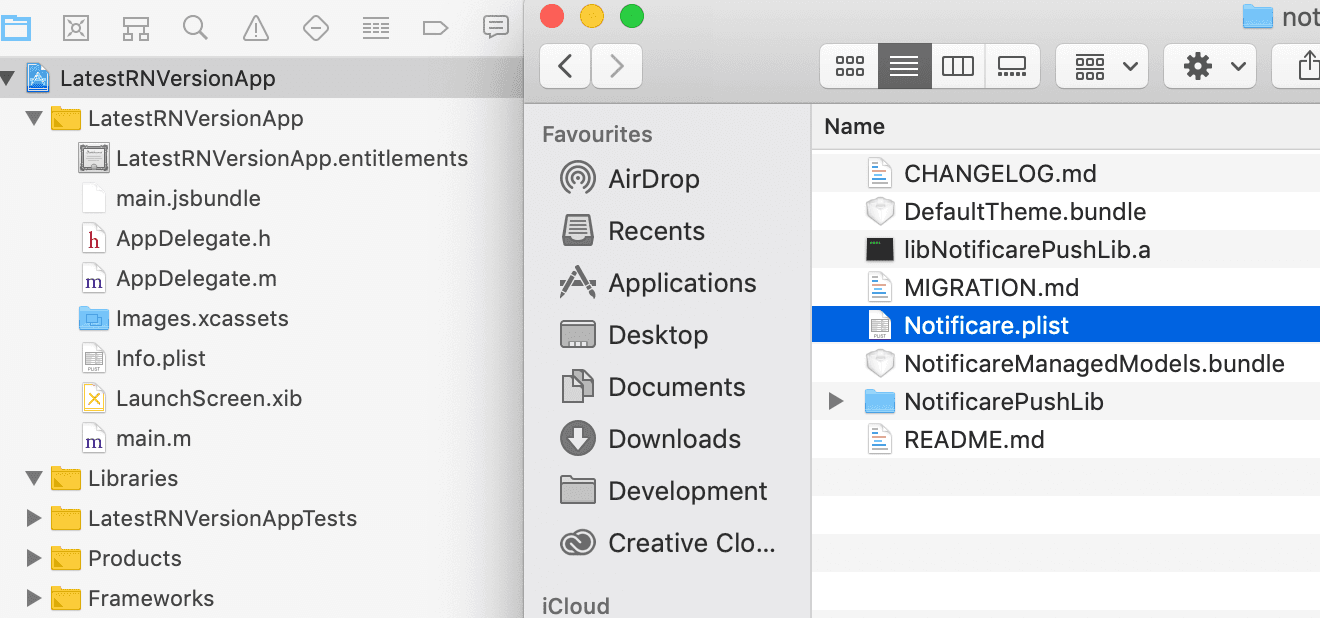
Before you continue, you need to make sure you disable the AppDelegate proxying in Notificare, which is not supported in React Native. For that simply open the Notificare.plist file you just dragged into your project and add the boolean property DISABLE_APP_DELEGATE_PROXY set to YES:

It is recommended that you create at least two different apps in Notificare using separated environments for development and production. For each app you will have a different set of keys, these keys should be copied and pasted in the file shown above. The DEVELOPMENT property should be set to YES or NO according to the environment you are building for. You can find your app keys by expanding your app's Settings menu item and clicking in App Keys as shown below:

Copy both the Application Key and Application Secret:

And paste them accordingly in the Notificare.plist file:

Entitlements
Before you can start implementing our library code, you will need to add all the capabilities to your project. Go to your app's target and click in the tab Capabilities:

If you're going to implement remote notifications, add the Push Notifications capability:

If you add the above capability, you also add the Background Modes capability and check the Remote Notifications option:

If you are targeting iOS 15 and using our SDK 2.7 and up, time sensitive notifications require a new capability. Add the Time Sensitive Notifications capability:

If you've subscribed to the Loyalty add-on and you will handle digital cards, then you should add the Wallet capability:

If you've subscribed to the Monetize add-on and you will sell digital products in your app, then you should add the In-App Purchase capability:

If you've subscribed to the Users & Authentication add-on and you will implement OAuth2 features in your app, then you should add the Keychain Sharing capability:

If you are going to implement the NFC Reader capabilities of our library, you must add the Near Field Communication Tag Reading capability:

If you are going to use Dynamic Links, you must add the Associated Domains capability and add all the domain prefixes you've created:

Requirements
When using React Native 0.59 and below, you must make sure you are using our React Native module 2.0.12 and Xcode 10. We are no longer providing support for this version of React Native, so we strongly urge you to upgrade to 0.60 or higher.
Install the Module
Open the command line under your project root directory and execute the following command:
react-native install notificare-push-lib-react-nativeConfigure your App
You will need to add some files included in our native library. For that, please download our latest release here. Unzip the downloaded file and open the resulting folder, then drag and drop Notificare.plist, DefaultTheme.bundle and NotificareManagedModels.bundle into your Xcode project:
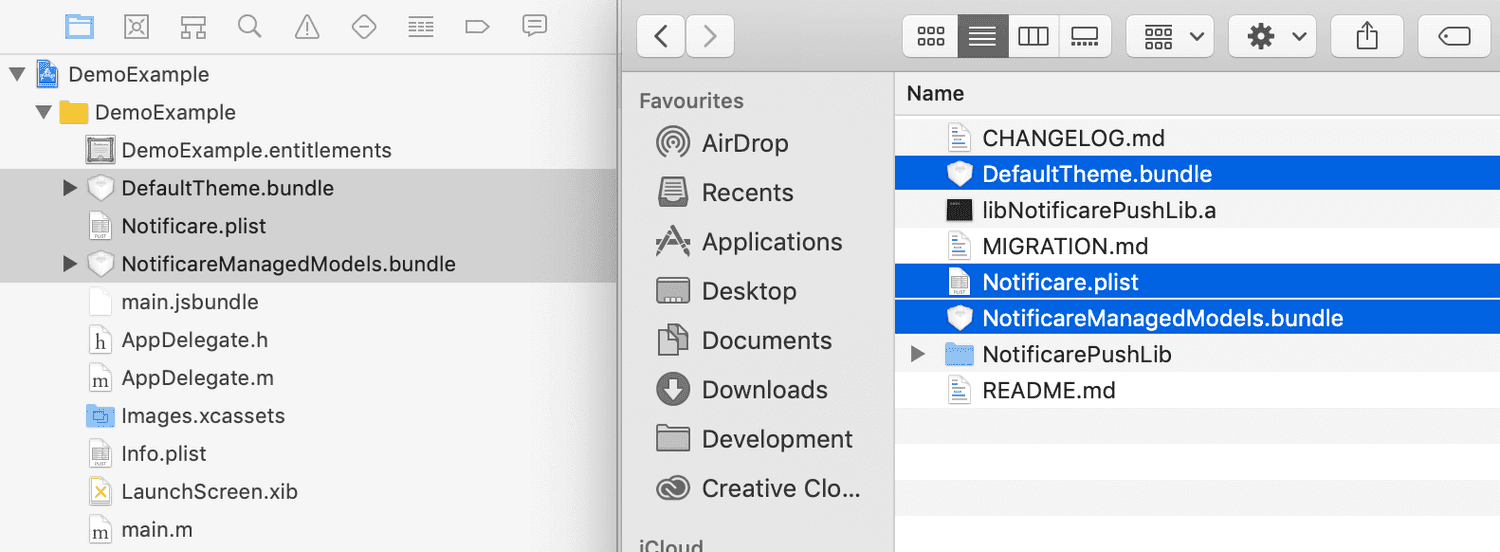
Before you continue, you need to make sure you disable the AppDelegate proxying in Notificare, which is not supported in React Native. For that simply open the Notificare.plist file you just dragged into your project and add the boolean property DISABLE_APP_DELEGATE_PROXY set to YES:

It is recommended that you create at least two different apps in Notificare using separated environments for development and production. For each app you will have a different set of keys, these keys should be copied and pasted in the file shown above. The DEVELOPMENT property should be set to YES or NO according to the environment you are building for. You can find your app keys by expanding your app's Settings menu item and clicking in App Keys as shown below:

Copy both the Application Key and Application Secret:

And paste them accordingly in the Notificare.plist file:

Now let’s add the frameworks needed. Open your project in Xcode and select your app's target, then click the Build Phases tab:
Then go ahead and select your app's target and open the Build Phases tab:
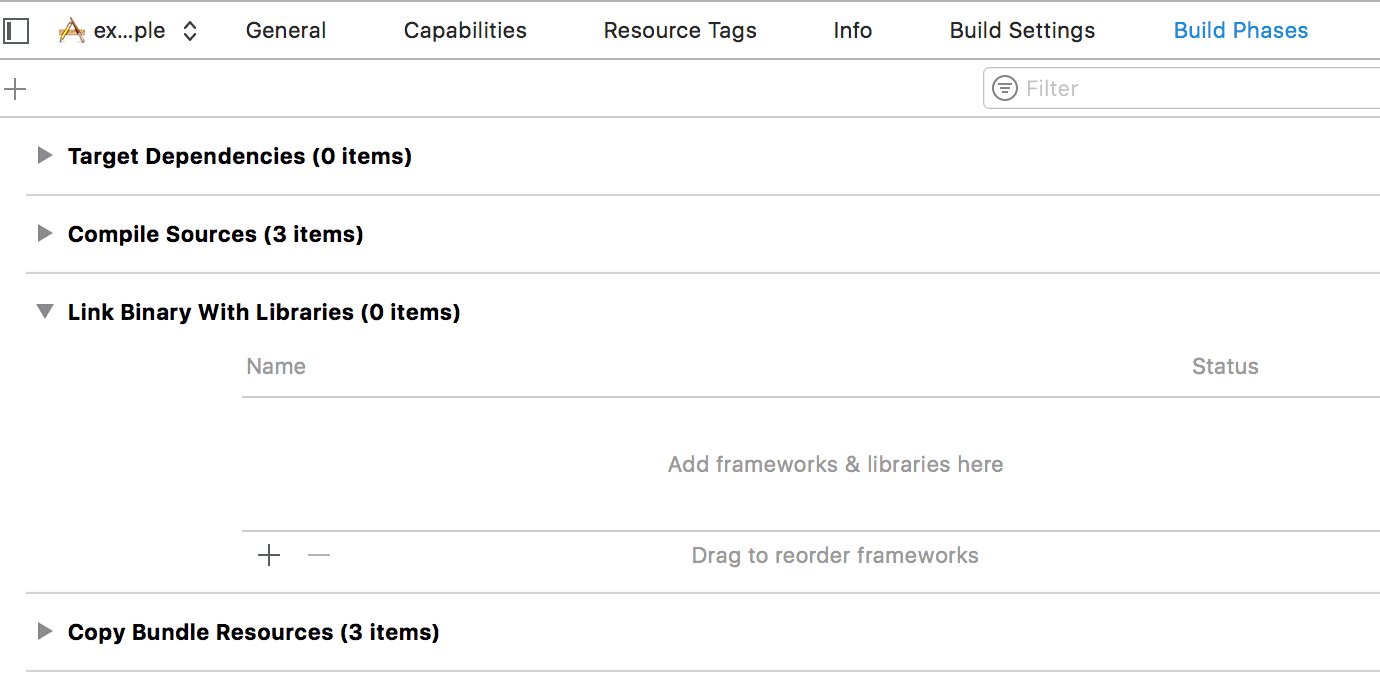
Expand the Link Binary with Libraries section and click in the plus button to start adding the necessary frameworks:
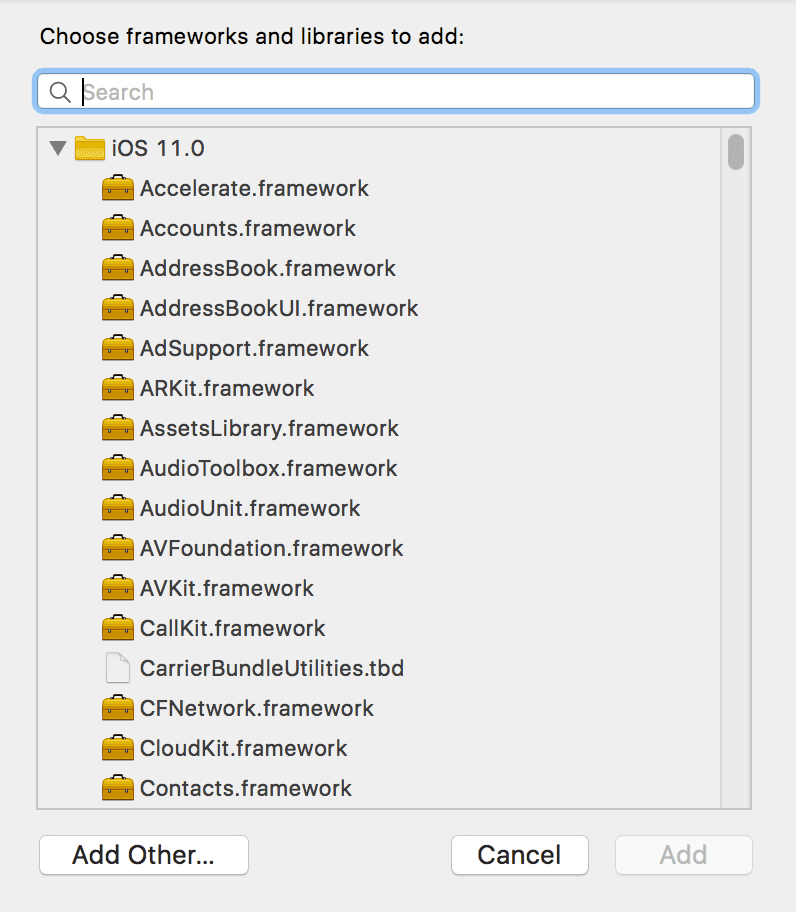
One by one add the following frameworks to your project:
- AVFoundation.framework
- CoreLocation.framework
- CoreData.framework
- PassKit.framework (add this framework only if you are going to use native Wallet passes and marked as optional)
- UserNotifications.framework (marked as optional)
- MobileCoreServices.framework
- MessageUI.framework
- libicucore.tbd
- UIKit.framework
- Foundation.framework
- CoreGraphics.framework
- MapKit.framework
- SystemConfiguration.framework
- Security.framework
- CFNetwork.framework
- ImageIO.framework
- StoreKit.framework
- WebKit.framework
After you've added all these frameworks your Link Binary with Libraries will look like this:
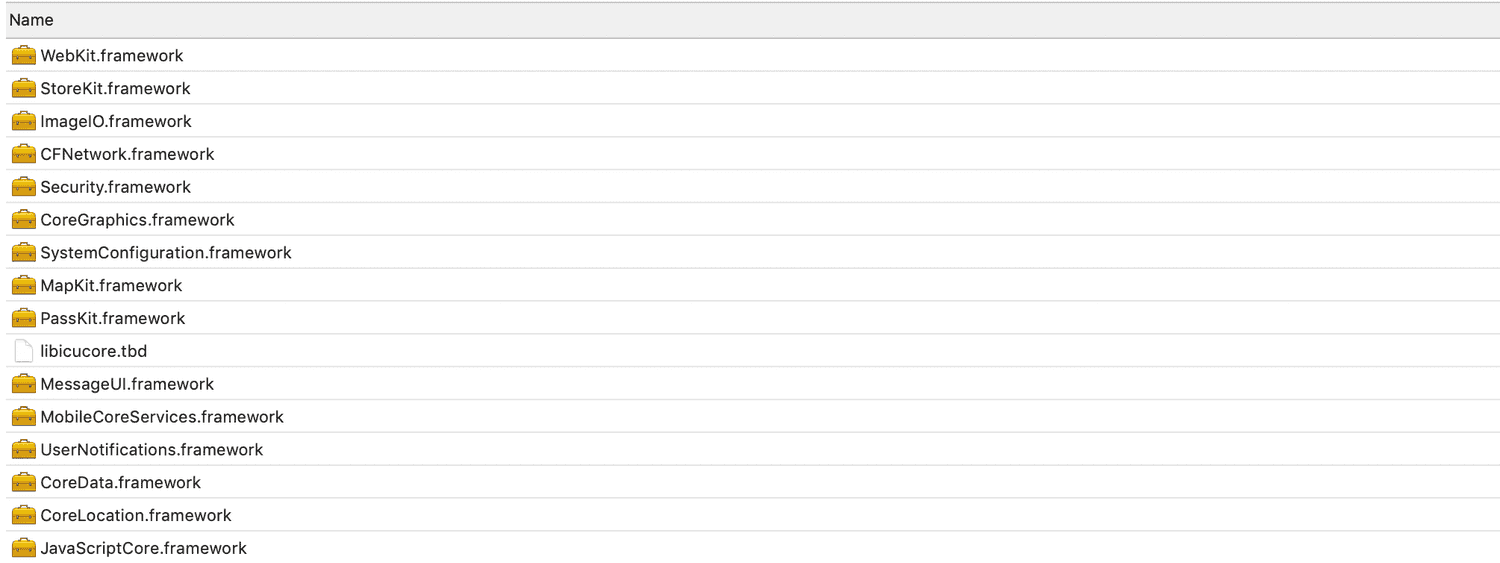
Finally, in your app's target, select the Build Settings tab and search for Other Linker Flags. In that property add -all_load, like shown below::

Entitlements
Before you can start implementing our library code, you will need to add all the capabilities to your project. Go to your app's target and click in the tab Capabilities:

If you're going to implement remote notifications, add the Push Notifications capability:

If you add the above capability, you also add the Background Modes capability and check the Remote Notifications option:

If you are targeting iOS 15 and using our SDK 2.7 and up, time sensitive notifications require a new capability. Add the Time Sensitive Notifications capability:

If you've subscribed to the Loyalty add-on and you will handle digital cards, then you should add the Wallet capability:

If you've subscribed to the Monetize add-on and you will sell digital products in your app, then you should add the In-App Purchase capability:

If you've subscribed to the Users & Authentication add-on and you will implement OAuth2 features in your app, then you should add the Keychain Sharing capability:

If you are going to implement the NFC Reader capabilities of our library, you must add the Near Field Communication Tag Reading capability:

If you are going to use Dynamic Links, you must add the Associated Domains capability and add all the domain prefixes you've created:

Implementation
You are now ready to start implementing the native code necessary to make our module work. Open the file AppDelegate.m and import our module header file:
#import "NotificareReactNativeIOS.h"Then in the didFinishLaunchingWithOptions method include the following before any other code:
- (BOOL)application:(UIApplication *)application didFinishLaunchingWithOptions:(NSDictionary *)launchOptions
{

    ...more code

    [NotificareReactNativeIOS launch:launchOptions];

    ...more code

}
To make sure we can handle notifications you will need the following methods to the AppDelegate.m file:
//Required to handle deep links
- (BOOL)application:(UIApplication *)application openURL:(nonnull NSURL *)url options:(nonnull NSDictionary<UIApplicationOpenURLOptionsKey,id> *)options{
    [NotificareReactNativeIOS handleOpenURL:url withOptions:options];
    return YES;
}

//Required to handle device registrations
-(void)application:(UIApplication *)application didRegisterForRemoteNotificationsWithDeviceToken:(nonnull NSData *)deviceToken {
    [NotificareReactNativeIOS didRegisterForRemoteNotificationsWithDeviceToken:deviceToken];
}

//Required to handle notifications
-(void)application:(UIApplication *)application didReceiveRemoteNotification:(nonnull NSDictionary *)userInfo fetchCompletionHandler:(nonnull void (^)(UIBackgroundFetchResult))completionHandler {

    [NotificareReactNativeIOS didReceiveRemoteNotification:userInfo completionHandler:^(id  _Nullable response, NSError * _Nullable error) {
        if (!error) {
            completionHandler(UIBackgroundFetchResultNewData);
        } else {
            completionHandler(UIBackgroundFetchResultNoData);
        }
    }];

}

//Required to handle actions in iOS 9 and below
-(void)application:(UIApplication *)application handleActionWithIdentifier:(nullable NSString *)identifier forRemoteNotification:(nonnull NSDictionary *)userInfo withResponseInfo:(nonnull NSDictionary *)responseInfo completionHandler:(nonnull void (^)())completionHandler{
    [[NotificarePushLib shared] handleActionWithIdentifier:identifier forRemoteNotification:userInfo withResponseInfo:responseInfo completionHandler:^(id  _Nullable response, NSError * _Nullable error) {
        completionHandler();
    }];
}

//Required to handle dynamic links
- (BOOL)application:(UIApplication *)application continueUserActivity:(NSUserActivity *)userActivity restorationHandler:(void (^)(NSArray<id<UIUserActivityRestoring>> * _Nullable __strong))restorationHandler {
    [[NotificarePushLib shared] continueUserActivity:userActivity restorationHandler:restorationHandler];
    return YES;
}
Optionally, you can also define which AuthorizationOptions your app should use. We will use UNAuthorizationOptionAlert, UNAuthorizationOptionBadge and UNAuthorizationOptionSound by default unless you want to choose to set it yourself. This must be done in the didFinishLaunchingWithOptions method before any other code:
- (BOOL)application:(UIApplication *)application didFinishLaunchingWithOptions:(NSDictionary *)launchOptions
{

    if (@available(iOS 12.0, *)) {
        [NotificareReactNativeIOS setAuthorizationOptions:UNAuthorizationOptionAlert + UNAuthorizationOptionBadge + UNAuthorizationOptionSound + UNAuthorizationOptionProvidesAppNotificationSettings];
    }

    if (@available(iOS 10.0, *)) {
        [NotificareReactNativeIOS setPresentationOptions:UNNotificationPresentationOptionAlert];
        [NotificareReactNativeIOS setCategoryOptions:UNNotificationCategoryOptionCustomDismissAction];
    }

    if (@available(iOS 11.0, *)) {
        [NotificareReactNativeIOS setCategoryOptions:UNNotificationCategoryOptionCustomDismissAction + UNNotificationCategoryOptionHiddenPreviewsShowTitle];
    }

    [NotificareReactNativeIOS launch:launchOptions];

    ...more code

}
Pretty much the same way, you can also define which PresentationOptions your app should use. We will use UNNotificationPresentationOptionNone by default unless you want to choose to set it yourself. This must be done in the didFinishLaunchingWithOptions method before any other code:
- (BOOL)application:(UIApplication *)application didFinishLaunchingWithOptions:(NSDictionary *)launchOptions
{

    if (@available(iOS 14.0, *)) {
        [NotificareReactNativeIOS setPresentationOptions:UNNotificationPresentationOptionBanner];
    } else {
        if (@available(iOS 10.0, *)) {
            [NotificareReactNativeIOS setPresentationOptions:UNNotificationPresentationOptionAlert];
        }
    }

    [NotificareReactNativeIOS launch:launchOptions];

    ...more code

}
Finally, you can also define which CategoryOptions your app should use. By default, in iOS 10 we will use UNNotificationCategoryOptionCustomDismissAction and in iOS 11 UNNotificationCategoryOptionCustomDismissAction and UNNotificationCategoryOptionHiddenPreviewsShowTitle unless you want to choose to set it yourself. This must be done in the didFinishLaunchingWithOptions method before any other code:
- (BOOL)application:(UIApplication *)application didFinishLaunchingWithOptions:(NSDictionary *)launchOptions
{

    if (@available(iOS 11.0, *)) {
        [NotificareReactNativeIOS setCategoryOptions:UNNotificationCategoryOptionCustomDismissAction + UNNotificationCategoryOptionHiddenPreviewsShowTitle];
    }

    [NotificareReactNativeIOS launch:launchOptions];

    ...more code

}
You are now ready to start implementing functionality in javascript. Open your App.js file and import the following modules:
import {
    ... more Libraries
    NativeModules,
    NativeEventEmitter
} from 'react-native';
Then let’s reference the Notificare Module so you can use it inside your React components:
const Notificare = NativeModules.NotificareReactNativeIOS;You can now start using Notificare in your component, for that you will to listen to events. The best way to initialize the event emitter class is to add it to the constructor of your component, like this:
export default class AwesomeProject extends Component {

  constructor(props){
    super(props);
    this.eventEmitter = new NativeEventEmitter(Notificare);

  }

... more code

}
Now the best way to initialize Notificare is to add the following to the componentDidMount method in your component:
export default class AwesomeProject extends Component {

    ...more code

    componentDidMount() {

        Notificare.launch();

        this.eventEmitter.addListener('ready', (data) => {

        });

        ...more code

    }

...more code

}
At this point, you have completed the basic setup of our library. Keep reading our implementation guides to dive deeper into each features available in our SDK.