Customizations
In this page we'll dive deeper into several aspects of our Android library that can be customized to match your needs.
Setting keys in code
Instead of relying on the notificare-services.json configuration file, it is possible to set those in code. If you are using the re.notifica.gradle.notificare-services Gradle plugin, go ahead and remove it since it requires the configuration file to be present. Furthermore, add the following metadata to your AndroidManifest.xml.
<meta-data
    android:name="re.notifica.auto_configuration_enabled"
    android:value="false" />
To configure Notificare, you must run the following code before any other interactions with the library.
class MainApplication : Application() {

    override fun onCreate() {
        super.onCreate()

        Notificare.configure(
            context = applicationContext,
            applicationKey = "",
            applicationSecret = "",
        )

        // more code ...
    }
}
The configure() method should be called before calling Notificare.launch() to make sure the correct keys are used. After setting the keys programmatically you can safely delete the notificare-services.json file.
Disabling crash reporting
By default, our library sends crash reports to our servers, which you can access via the Dashboard > Your App > Events > Application Error, in order to facilitate the debugging process for developers. If you would like to opt-out, you can do so by setting a metadata tab in your AndroidManifest.xml.
<meta-data
    android:name="re.notifica.crash_reports_enabled"
    android:value="false" />
Notification channels
Starting in Android 8 (a.k.a Oreo), in order for your app to display notifications, you need to create channels. Without a channel, notifications will never appear in the notification manager. By default, we create a single channel.
Every notification will appear in the default channel "Push Notifications". You can change the name and the description of the default channel by adding these values in your app/res/strings.xml file:
<string name="notificare_default_channel_name">Push Notifications</string>
<string name="notificare_default_channel_description">This channel shows push notifications</string>
You can also create channels yourself in the app. If you want a channel that your app created to be the default channel, add the following metadata tag to your AndroidManifest.xml:
<meta-data
    android:name="re.notifica.push.default_channel_id"
    android:value="my_custom_channel_id" />
If you want to prevent Notificare from creating the default channel automatically, you can add the follow metadata tag to your AndroidManifest.xml.
<meta-data
    android:name="re.notifica.push.automatic_default_channel_enabled"
    android:value="false" />
Notification LED Settings
You can send along the preferred color and blinking time of the notification light (only works on selected device models) per notification from the Notificare REST API or the Dashboard. However, you can also set a default color for your app. If neither are set, it defaults to white colored blinking for 500 ms on and 1500 ms off.
<meta-data
    android:name="re.notifica.push.notification_lights_color"
    android:value="red" />

<meta-data
    android:name="re.notifica.push.notification_lights_on"
    android:value="1000" />

<meta-data
    android:name="re.notifica.push.notification_lights_off"
    android:value="2000" />
Notification Icon Settings
Notificare will use the application icon as the icon for notifications. You can change this behaviour by specifying the following in your AndroidManifest.xml.
<meta-data
    android:name="re.notifica.push.notification_small_icon"
    android:resource="@drawable/ic_rocket_black_24dp" />

<meta-data
    android:name="re.notifica.push.notification_accent_color"
    android:resource="@color/notificare_blue" />
Disabling Notification's Auto Cancel
When the user interacts with a notification, we automatically remove it from the Notification Center. If you would like to disable this behaviour, you can set the auto-cancel property.
<meta-data
    android:name="re.notifica.push.notification_auto_cancel"
    android:value="false" />
Increase the limit for monitored regions
When location updates are enabled and the appropriate permissions have been granted, our library automatically monitors both regions and beacons. The operative system allows a maximum of 100 regions and, we monitor 10 regions by default. You can customize an upper limit for region monitoring by adding the following parameter to the AndroidManifest.xml.
<meta-data
    android:name="re.notifica.geo.monitored_regions_limit"
    android:value="100" />
Notifications UI
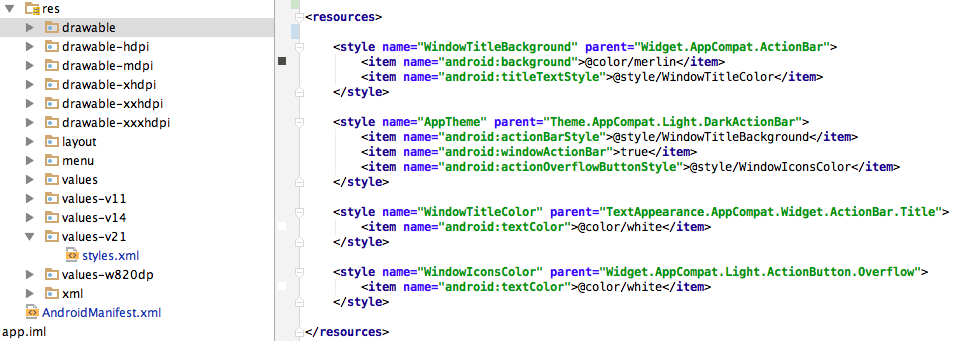
Changing user interface in the Android is intrinsically decided by your app's styles. Basically Notificare will just use the styles you provide in your app, for the several elements used throughout our UI.
We recommend these changes to be done in your res/values folders like shown below:

Action Labels
Labels used for Action Buttons in both the Notification Manager and Notification Dialogs can be localized by adding them as strings resources, where the name is equal to the label.
To protect collision of resource names, they can be prefixed with a string. The prefix must then be set by using the options in the AndroidManifest.xml.
<meta-data
    android:name="re.notifica.action_label_prefix"
    android:value="custom_prefix" />